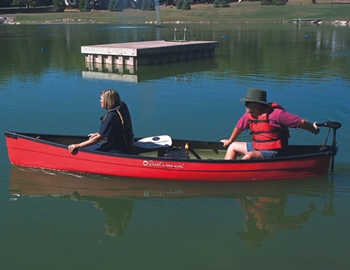
When you go fishing with your canoe, the chances are that most of your time will be spent paddling. By the time you get to your fishing spot, you will already be so tired that all you will want to do is pack and go home. Plus, if bad luck strikes and you lose a paddle, having a motor should certainly make things much easier for you.
In that regard, a trolling motor would be a better solution. It’s quieter, so you do not risk scaring off the fish. It may require different installations, depending on the place and type of control that you go for – but once it is in place, it should be easy to use.
Deciding on the Controls
 One thing that you need to keep in mind when you are installing a trolling motor is that you may have to install the controls in different places. This will depend on the kind of motor that you are going for:
- Hand-Controlled: Hand-controlled trolling motors are quite easy to use, and all you have to do to install those controls is to clamp them to your canoe. They are among the least expensive trolling motors, but they will require that you use one hand.
- Foot-Controlled: With a foot-controlled trolling motor, the hands will always be free. However, you may need to get a certain bracket in order to attach it to the canoe.
- Wireless-Controlled: It may be more expensive, but it leaves both your hands and feet free. At the same time, it is a bit harder to install, along with being slightly more difficult to use.
Once you decide on the controls and buy the motor, the next steps should be easy. Remember that you should always install the one that fits your purposes the best.
Selecting the Trolling Motor Mount
When you are putting a trolling motor on your canoe, you need to determine the mount. Depending on your canoe and your preferences, you may either want to go for a top rail or a sidesaddle trolling mount. Both options will be installed differently.
· Top Rail Trolling Motor Mount
This type of trolling motor mount is among the most popular options – one that is provided by various manufacturers. You have a thick piece of bar sitting on your canoe’s top rail, extending to the side. The perk of this kind of mount is that you may put it on any canoe, which makes the installation process less complicated.
When installing this type of mount for your motor, two of the blots will be going with a clamp system or retainer through a flat bar, therefore securing it to the canoe. A hardwood block (for example, Ashe) will also be mounted on the section of flat bar that extends outside the canoe. Make sure that it stays in an upright position so that you may install the motor on it.
· Sidesaddle Trolling Motor Mount
The second type is the sidesaddle mount. This is shaped like a triangle, clamping onto the side of your canoe. The clamp will go around your canoe’s top rail – but bear in mind that if you want it to be secure (which you should), you need it to have a specific fit. You also have a block there that attaches to the mount top, where you need to put the trolling motor.
Under normal circumstances, the sidesaddle mount is made by the manufacturer of the canoe – therefore, ensuring that the fit is just perfect and not obstructing the access to any spots on the boat. It is also the type of mount that you want to go for if you have a more powerful motor.
Mounting the Trolling Motor
Once you decide on the mount and the motor that you want, you need to think about where you want it to be installed. You can place it on the stern, the bow, or the engine – depending on your preferences. Each of these motor types has different installation steps, so you may want to be attentive about the way you go around it.
· Stern (Transom) Motors
These motors are a good option for beginners that have never installed a motor on a canoe before – all you have to do is to attach it to the stern using a clamp. They are also great to install if you have a smaller canoe.
The transom motor can be used for multiple types of boats, but they are generally the preferred choice when it comes to canoes. This is because these boats are smaller, with less space to go on. Bear in mind that if you decide to install this type of motor, you might not have as much control, and there aren’t as many models to go around either.
That being said, its installation is as simple as it can get. To open the clamps, you need to turn them counterclockwise. Make sure that you place it as close to the middle of the stern as you can. Once you place it, turn the clamp clockwise, and go as far as you can. This will ensure that the motor stays secure.
It is essential that you mount the transom motor so that the motor section is about 9 inches under the water. This way, the motor can poke out of the water and make quite a bit of noise – therefore, spooking the fish.
· Bow Motor Mounting
Professional fishermen are usually all fans of bow motors, as they provide much better control in comparison to the stern motor. This is because rather than pushing the motor through the water, this kind of motor is pulling it.
Bow motors come with multiple features – but at the same time, they are a bit more difficult to install. They also take a bit more room. You will need a flat deck to install it – and the overall costs can exceed the price of a stern motor quite a lot.
When putting a bow trolling motor, you need to make sure that you choose the mount base that fits your boat properly, leaving enough place for the motor to break away (if you have that kind of motor). Also, make sure that the mounting screws will go through the base – not the hull.
Before you begin to install the trolling motor, mark the holes where you want to drill into the deck; you want everything to be precise. At this point, you may want to use the mount base as a template – drilling the hole about a ¼-inch deep. Don’t forget to clear away the debris after that. Continue by treading a bolt through each of the holes you just made.
Place a washer on all of the bolts, right underneath the wall base. Place the base in the holes after that and make sure that it is leveled to the deck. Thread a washer on each of those bolts too and ensure that the mount and motor are secured.
Ideally, this trolling motor should be placed about 5 inches below the level of the water. However, if you are in a standing position as you are fishing, with the motor running, then it should be at least 12 inches deep.
· Engine Motor Mounting
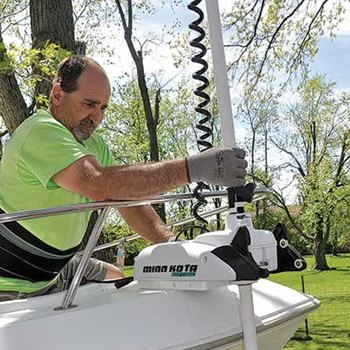 Engine motors are the preferred choice for those who want to save space without sacrificing the features. They are a great choice for multi-purpose boats, and they save quite a bit of space. When the engine is off, the motor is underwater. However, when the boat is going at full speed, the motor comes out. They are slightly more difficult to control.
To put this kind of motor on a canoe, you need to place the bracket on an anti-cavitation plate, making sure that the motor is up. If you don’t know what the anti-cavitation plate is, it’s that horizontal plate found above the propeller. The mount should act as a template for you to mark some holes on the anti-cavitation plate. Remember to use a sharp drill; otherwise, you won’t able to break through the metal.
Place your mounting bracket of choice on the anti-cavitation plate and put in the mounting bolts. Like with the other motor types, you need to be certain that the motor has been secured properly before you use it.
Ideally, the cavitation plate should be about 13 inches below the level of the water. This way, the motor will be around 6 inches deep once you turn it on.
Final Thoughts
Installing a trolling motor is fairly easy, once you determine where it should go and how you wish to mount it. In the end, make sure that everything is tight and secured – otherwise, you will just end up with a noisy and flimsy motor. Once you have that trolling motor installed, you should be able to cover greater distances, without tiring yourself out.